Location lighting workshop

I had always tried to ignore location lighting, whenever i was in tutor and someone mentioned it i automatically would be put of the idea of taking a lighting kit to location and setting up everything outside of the studio environment. For me, location lighting just wasn’t my idea of an practical, easy shoot. When i saw on the timetable we had a location lighting workshop coming up i was so pleased!

I really did enjoy this workshop and learnt so much about working on location. To start of with, the place where we were located (trinity centre) was an incredible place, the building is a converted church and still had its church like aesthetics to it. Grand, peaceful and beautiful rooms. We got split into 2 smaller groups, my group were sent to the small red room

Inside this room was a beautiful old white piano which we thought would be a great prop to use in our shoot. Firstly we just set up one light (below) but unfortunately the wall opposite the light was white therfore the flash was bouncing off the wall creating a very strong shadow on the subject. We placed the black cover from on of the umbrellas on the wall to try and stop this but again the shadow was still to strong so we then decided to add another light (examples below).


We decided to challenge ourselves for a take a photography with a subject sat next to the window. We orgininally had the two lights but this was too bright, took it down to one and this was still too bright. We then began to use the reflectors. This shot took a long time to take, the subject was lit well with the reflectors it was just the window behind lacked a bit of detail so we tried to get this detail back. The set up is in images below.

We used a reflector each side of the subject and a flash. I went underneath the left reflector with the flash, pointed it against the right reflector so the light reflected on to the window. The problem we had here was the the flash kept seeping through the left reflector and hiting the subject so we had another person stood holding their black jacket under the reflector to stop the light flooding onto the subject.

This workshop was overall one of the most helpful! I never realised how similar to the studio it was and as i’m comfortable in the studio i should be comfortable on location. I did pick up the fact that if i were to ever go out and use the location lighting kit i would need a lot more people than just myself. Throughout the shoot there were small things that we needed someone to hold or do and it was really handy just having the extra person there, so at least 2 assistants  i think depending on what i plan to do. I now feel comfortable and ready to go out and use this kit!

Large format workshop

Yesterday we had a workshop on large format cameras. We looked at a Sinar which is recommend to use in a studio and a Toyo which is recommended to be used on location. The advantages of using a large format camera  firstly  is the fact that the negatives are massive (5×5 or 10×8) therefore the camera captures great detail which means the images can be printed very large. It is also possible to exaggerate a narrow depth of field due to the movement of the bellows which isn’t possible to do on a 35mm or medium format camera. Large format cameras are often used in architectural photography as the free movement of the bellows allows the photographer to be able to line up the edges of a building without them distorting. Unfortunately large format does also come with cons. The main thing that would stop me from using large format is the cost of the film and processing, but this does tend to level out with the quality of the images you get. These cameras are also very fiddly and take a long time to set up so if you were on a location shoot it would be quite time consuming but again the quality of the images that you will get makes the process worth while.

When using a large format camera the main process in taking an images is to:

  • Open lens
  • Focus through back (open f stop for the brightest setting)
  • Put in the dark slide
  • Check shutter speed and F stop
  • Shut lens
  • Take one dark slide out
  • Cock lens
  • Take picture

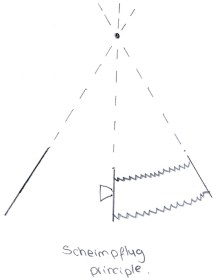
Some of the steps above need more work to them depending on what sort of image the photographer wants to create, for example the focusing. Each front and back standard moves in either a tilt or a rise and fall action, these movements are helpful when needing to focus on certain parts of the subject.  For parallel focusing the standards don’t have a need to move but when the subject is placed somewhere which is hard to move close to or on an angle the photographer needs to follow the Scheimpflug principle. This means that the subject, back standard and front standard need to all meet at one point allowing the subject to be able to focus fully rather than just one part.  Below is a diagram to explain this principle:


To exaggerate the focus the standards just need to be moved around, for example if the photographer was to shoot a portrait but just wanted the eyes to be in focus they would need to tilt the top of the front and back standard inwards to create this effect. Using large format does increase the experimentation of focus which would be quite fun to play around with in the future!

When using large format, due to the bellows the aperture needs to be changed to a lower F stop. When the image is taken some light gets lost when travelling through the bellows which is why the lens needs to be slightly more wider to allow the right amount of light to pass through. To work out which aperture the camera needs to be on the bellows need to be measured and for every 100% (100% = the mm of lens) 2 stops need to be added. An example is below:

Lens 150mm

Bellows – 300mm (100% extra) = 2 stops (150+150)

225mm (50%) = 1 stop (150+75)

187.5 (25%) = 1/2 stop (150+37.5)
I was originally thinking of using large format for my project but I’m not expecting to print out the portraits as big as the 5×8 negs offer. Medium format 6×6 will be the perfect size for my portraits! I will defiantly be using large format in the furture though as there is so much to experiment with in this format!